Brows are one of the most defining features of our faces. They have the power to enhance our natural beauty but also can make or break our overall look. In recent years, microblading has become increasingly popular as a semi-permanent solution to achieve fuller, natural-looking brows. However, another technique is gaining popularity.
3D microshading
This article will dive into 3D micro shading’s history, benefits, and step-by-step process. We will cover everything from understanding the technique to its long-lasting effects and suitability for all skin types. Whether you are curious about this beauty trend or looking for an alternative to microblading, this post is for you. So, let’s get started and discover how 3D microshading can help you achieve the brows you’ve always wanted.
What Is 3D Microshading?
3D microshading, ombre shading, or powder brows, is a semi-permanent eyebrow tattooing technique that creates a soft, powdered effect that mimics the look of filled-in eyebrows. Unlike microblading, which makes individual hair-like strokes, 3D microshading uses a stippling technique to create a gradient effect, giving a more natural-looking result.
During the 3D microshading process, a technician uses a small handheld tool to deposit pigment into the skin in a stippling motion. This technique creates tiny dots of color, which blend to create a soft gradient effect. In addition, the technician can control the depth and intensity of the pigment, allowing for a custom result that complements the client’s skin tone and hair color.
Comparison Of Microblading And Microshading
Microblading and microshading are popular techniques for achieving fuller, more defined brows. However, there are some critical differences between the two. Microblading uses a small handheld tool with a row of fine needles to create individual hair-like strokes. The strokes are then filled in with pigment to make the appearance of natural eyebrow hair. Microshading, on the other hand, uses a stippling technique to create a more filled-in, powder-like effect. In addition, micro shading is ideal for clients with oily skin, as it lasts longer than microblading.
How 3D Microshading Differs From Other Techniques
3D microshading differs from other eyebrow tattooing techniques in several ways. Traditional tattooing methods often use a machine to deposit pigment into the skin, which can result in a harsh, unnatural look. Microblading and microshading, on the other hand, use a handheld tool that allows for greater precision and control. In addition, 3D microshading differs from microblading in creating a softer, more diffused effect. It also lasts longer than microblading, as the pigment is deeper into the skin.
The Benefits Of 3D Microshading
3D microshading offers many benefits over traditional eyebrow tattooing methods when achieving fuller, more defined brows. Here are just a few of the benefits of 3D microshading.
Natural-Looking Results: One of the enormous benefits of 3D microshading is the natural-looking results it produces. The stippling technique creates a soft, diffused effect that mimics the look of filled-in eyebrows without traditional tattooing methods’ harsh lines and unnatural appearance.
Customizable To Individual Preferences: Another great benefit of 3D microshading is that it can be customized to individual preferences. The technician can adjust the depth and intensity of the pigment, allowing for a tailored result that complements the client’s skin tone and hair color.
Long-Lasting Effects: 3D microshading is a semi-permanent solution that can last up to two years with proper aftercare. This means clients can enjoy fuller, more defined brows without the hassle of daily makeup application or frequent touch-ups.
Minimal Pain And Discomfort: 3D microshading causes minimal pain and discomfort compared to traditional tattooing methods. The handheld tool used in the technique is gentle on the skin, making it an excellent option for sensitive or prone to discomfort during tattooing procedures.
Suitable For All Skin Types: 3D microshading suits all skin types, including oily or sensitive skin. Unlike microblading, which may not be ideal for those with oily skin, 3D micro shading lasts longer and is less likely to fade or blur over time.
Preparing For Your 3d Microshading Appointment
If you’ve decided to try 3D microshading for fuller, more defined brows, it’s essential to prepare for your appointment correctly. Here are a few key steps to take before your appointment to ensure the best possible results.
Consultation With A Professional
Before booking your 3D microshading appointment, consulting a professional is essential. This will allow you to discuss your expectations and preferences and any concerns you may have. The technician can also assess your skin and hair color to determine the best approach for achieving natural-looking results.
Understanding The Process And Expectations
It’s essential to clearly understand the 3D microshading process and what to expect during your appointment. The technician will use a handheld tool to deposit pigment into the skin, creating a soft, diffused effect that mimics the look of filled-in eyebrows. The process can take up to two hours, depending on the complexity of the design. It’s important to understand that the initial results may appear darker than desired but fade to a more natural-looking shade over time.
Aftercare Instructions And Tips
Proper aftercare ensures the best possible results from your 3D microshading appointment. The technician will provide you with specific aftercare instructions, including avoiding certain activities (such as swimming or sweating excessively) after the meeting. Following these instructions closely is essential to ensure the pigment sets appropriately and the results last as long as possible. Other aftercare tips include avoiding direct sunlight, using a gentle cleanser to wash your face, and applying a healing ointment to the treated area.
The 3D Microshading Process
3D microshading is a semi-permanent cosmetic tattooing technique that creates the illusion of fuller, more defined brows. Here’s a step-by-step guide to the 3D microshading process.
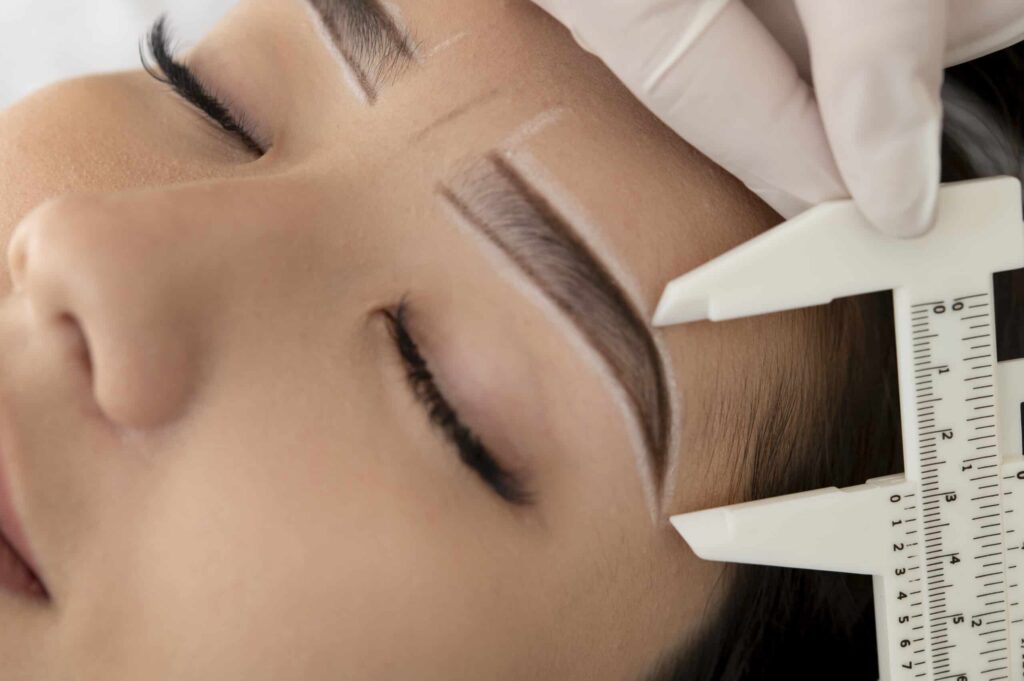
Consultation: Before beginning the procedure, the technician will talk with the client to discuss their expectations and preferences and assess their skin and hair color.
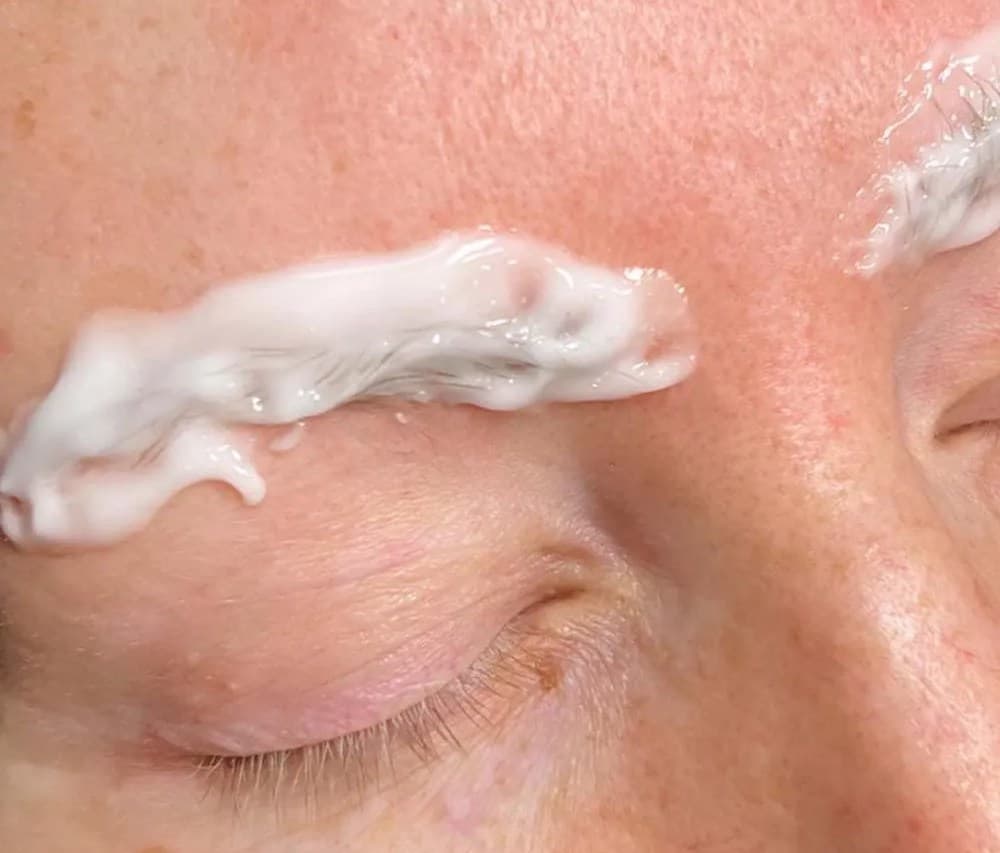
Numbing Cream: Once the client is comfortable with the procedure, the technician will apply a numbing cream to the brow area to minimize discomfort.
Mapping And shaping: The technician will map and shape the brows, using a pencil to create a guide for the microshading process. This ensures the brows are symmetrical and the client is happy with the final shape.
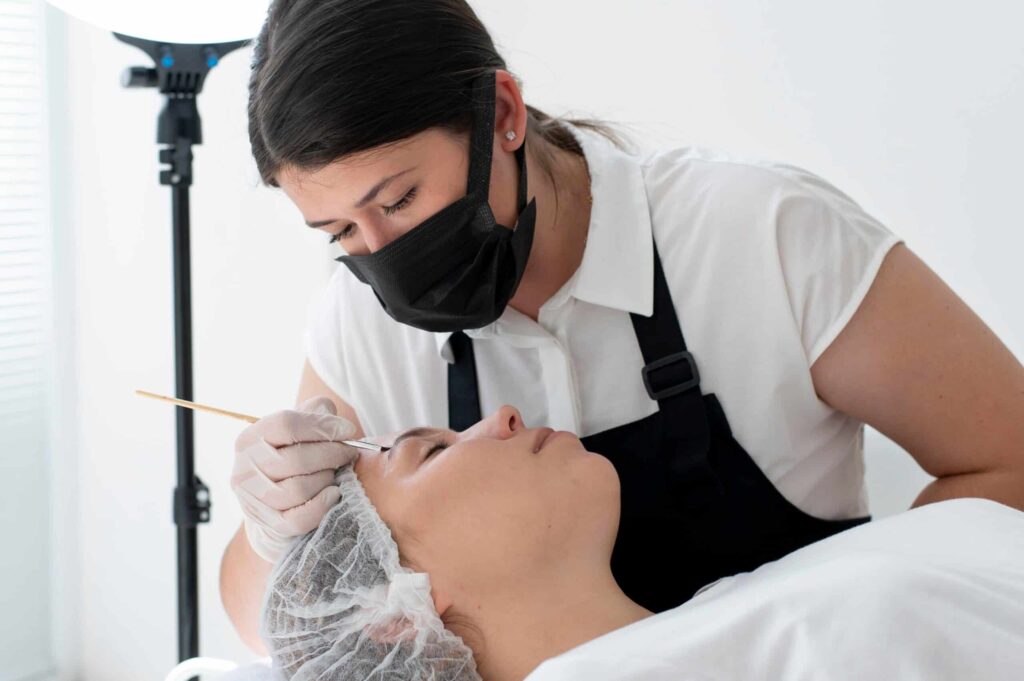
Pigment Application: Using a handheld tool, the technician will deposit small dots of pigment into the skin, using a stippling technique to create a soft, diffused effect. This process is repeated until the desired level of density and coverage is achieved.
Aftercare: Once the micro shading is complete, the technician will provide the client with aftercare instructions, including avoiding certain activities and applying a healing ointment to the treated area.
Tools And Equipment Used: The handheld tool in 3D micro shading typically consists of tiny needles arranged in a line or circular shape. The device creates small, controlled punctures in the skin, depositing pigment in a soft, diffused pattern that mimics the appearance of natural hair.
How Long The Process Takes: The duration of the 3D microshading process can vary depending on the complexity of the design and the level of density and coverage desired. Generally, the process can take up to two hours, including consultation, mapping and shaping, pigment application, and aftercare instructions.
Aftercare For 3D Microshading
After undergoing 3D micro shading, you must properly care for your brows to ensure optimal healing and long-lasting results. Here are some aftercare tips.
Keep The Area Clean: In the first few days following the procedure, avoid getting the treated area wet. Once it’s safe to clean the area, use a gentle cleanser and avoid rubbing the brows vigorously.

Apply Ointment: After cleaning the area, apply a thin layer of ointment to keep the brows moisturized and promote healing. Avoid using products that contain alcohol or harsh chemicals.
Avoid Certain Activities: At least a week after the procedure, avoid activities that could cause excess sweating, such as exercising or saunas. Also, avoid exposing the treated area to direct sunlight or tanning beds.
Don’t Pick Or Scratch: It’s essential to avoid picking or scratching the treated area, as this can cause the pigment to come out and lead to patchiness or scarring.
Timeline For Healing And Touch-Ups
The healing time for 3D microshading can vary depending on several factors, including skin type, age, and lifestyle. Generally, the initial healing process takes about two weeks, and the brows may appear darker than expected. Over the next few weeks, the pigment will fade slightly, settling into a natural-looking shade.
After six weeks, the client may require a touch-up to ensure the pigment is even and long-lasting. Touch-ups are typically needed every twelve to eighteen months, depending on how well the stain has held up and the client’s preferences.
Avoiding Common Mistakes And Complications
To avoid complications and ensure long-lasting results, following aftercare instructions is essential. Common mistakes to avoid include picking or scratching the treated area, using harsh products, and exposing the brows to direct sunlight. Contact the technician immediately if any complications occur, such as redness, swelling, or infection. With proper aftercare and maintenance, 3D micro shading can provide long-lasting, natural-looking results.
3D microshading is a popular and effective technique for enhancing your brows and achieving a natural-looking result. With its customizable approach, long-lasting effects, and minimal pain and discomfort, it’s no wonder why more and more people are turning to micro shading for their brow needs. However, proper aftercare and maintenance are crucial to ensure optimal healing and long-lasting results. If you’re interested in 3D micro shading, contact us today at 760-206-6641 or visit our website at http://lavishingeyebrows.com/ to learn more and schedule a consultation with one of our professional technicians. Don’t hesitate to take the first step towards achieving the brows you’ve always wanted!